Midnight Blue - the joys of restoration

This is where Fairey "Projects" can be be announced and progress monitored.

Don't forget to write up some notes for the Fairey News.


Post Reply
Midnight Blue
Commodore
Posts: 259
Joined: Wed Jan 28, 2009 8:13 pm
Location: United Kingdom

Midnight Blue - the joys of restoration

Post by Midnight Blue »

When you start reinstating everything you might be forgiven for thinking you are out of the woods(no pun intended)…

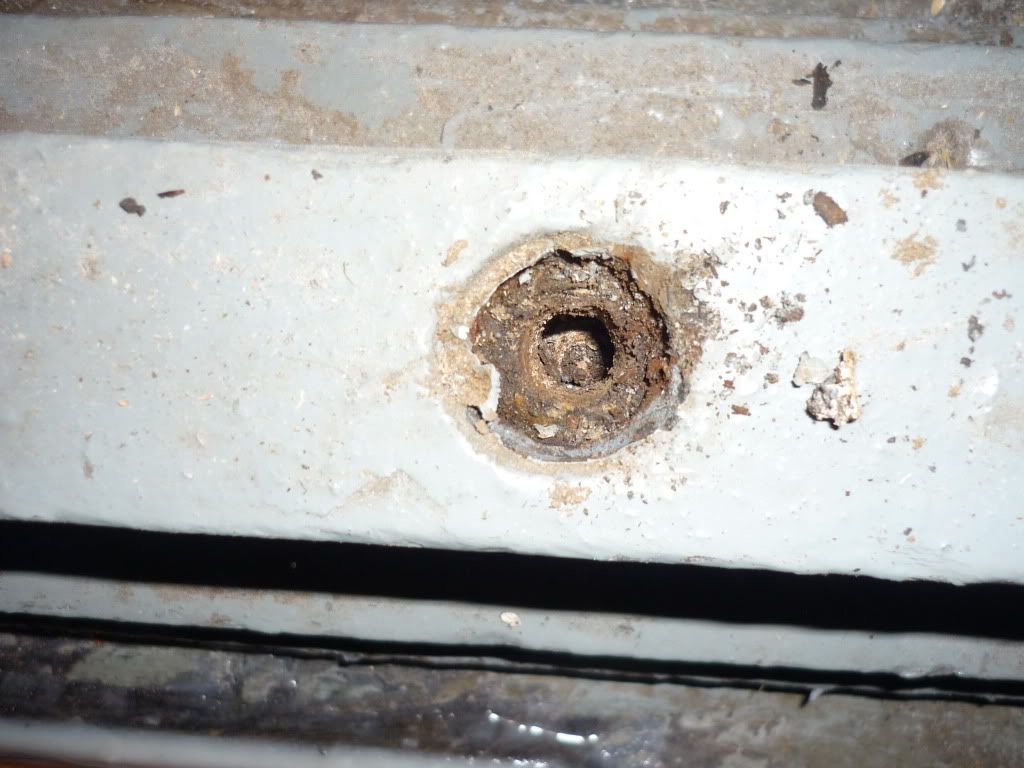
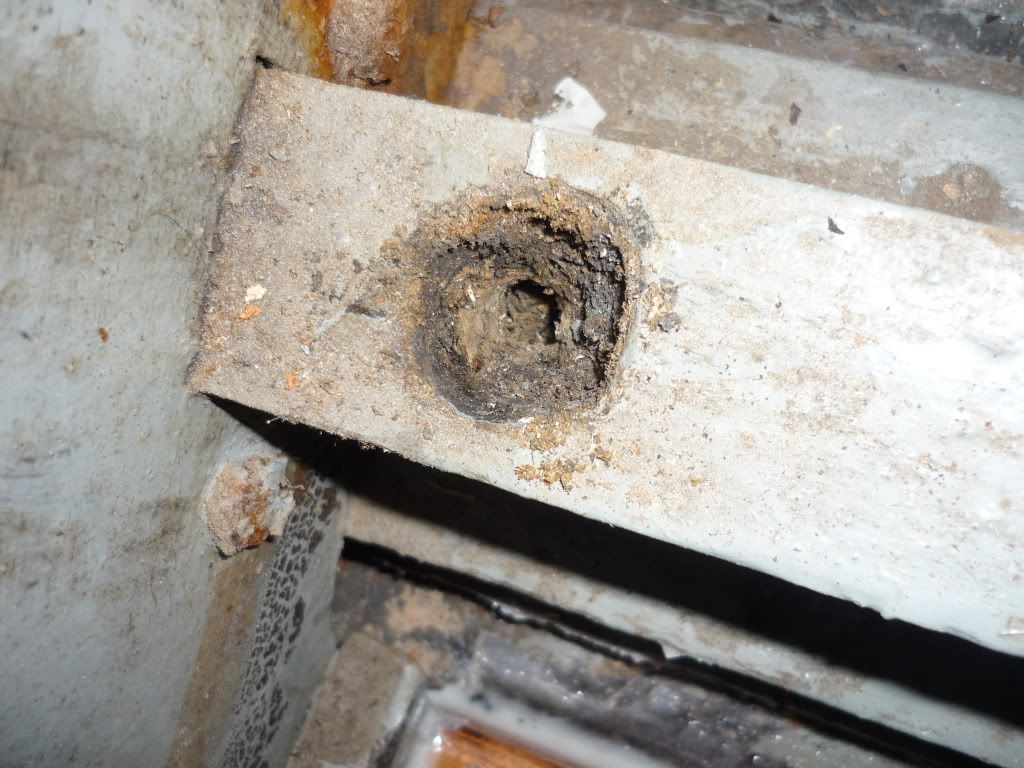
At the keel aft of the engine bay bulkhead it looks like there are approximately six keel bolts running through. What I actually had is six lengths of timber dowel with some caulking cotton and a bit of bedding compound around the top. The dowel actually makes it look like the tip of a keel bolt but there is actually no mechanical fastening holding the aft section of the boat together.

Whoever repaired the aft exterior section of the keel pulled all the bolts out and didn't put any of them back. Alan Burnard was heard to say that the engineers worked to a few thou’ but the boatbuilders barely knew which boat they were on! So maybe it was part of the original construction.

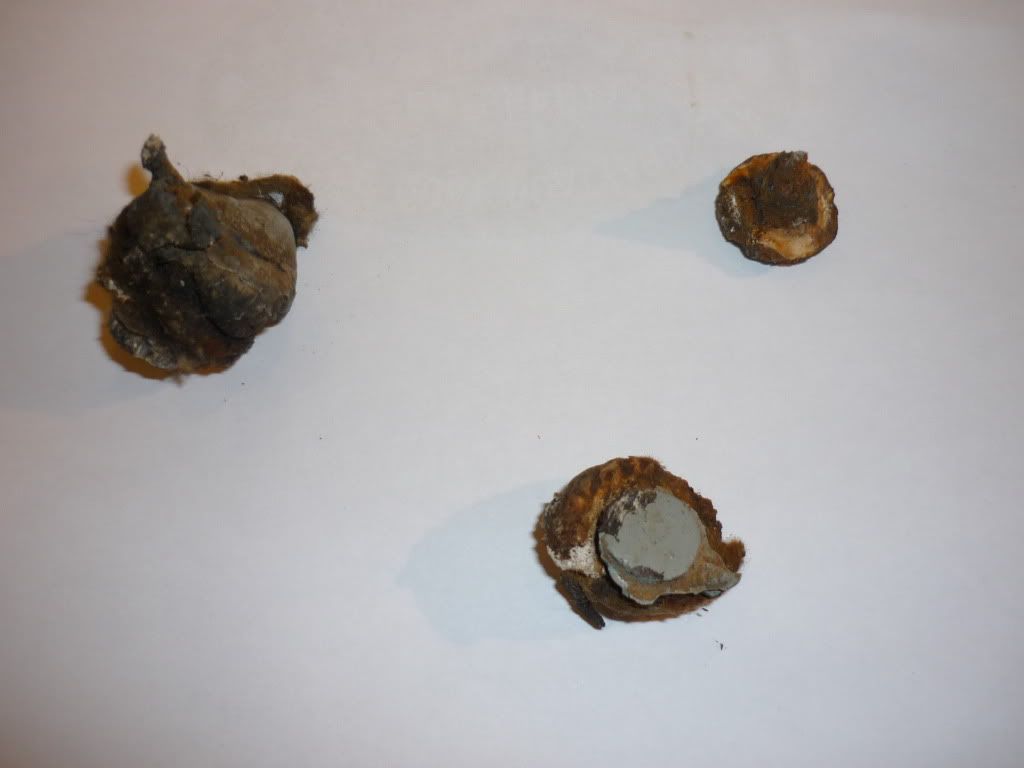
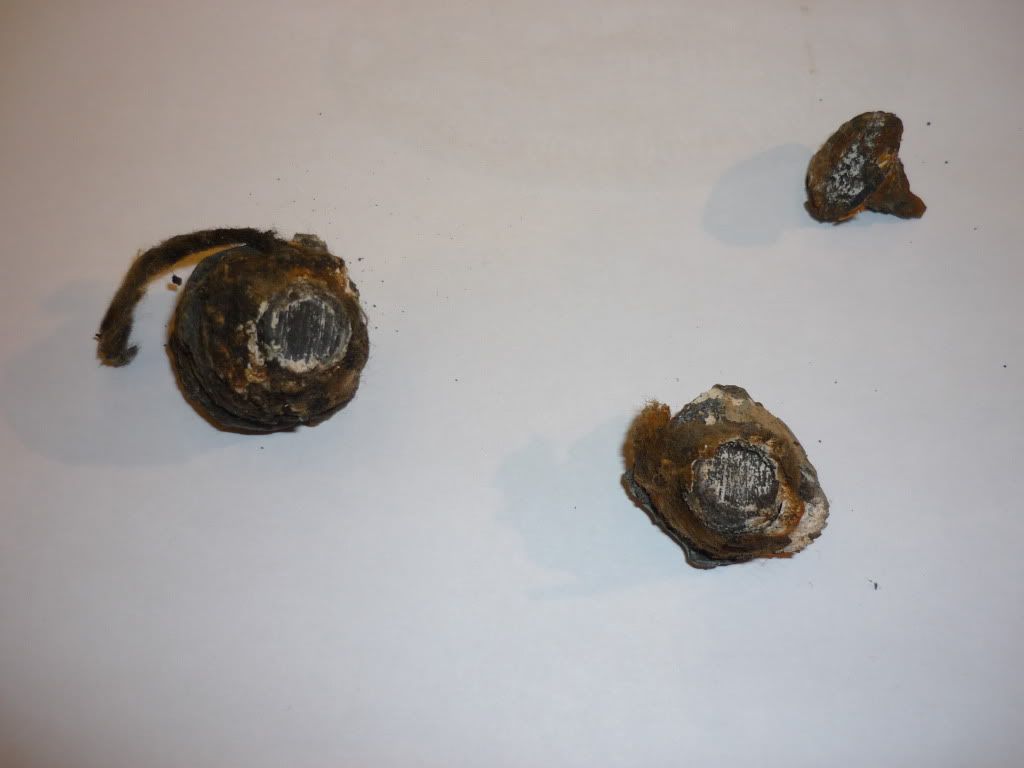
In the engine bay I was hoping not to replace the keel bolts but unfortunately whilst testing them, the head sheered straight off one of them.

Options for removing them were to try and 'jack' them up from underneath and keep cutting them off on the inside until the length of the bolt was removed. We tried physically hammering one down from inside the boat but absolutely nothing happened.

Another option was to remove the rusted bolt heads from the outside, see if we could punch or sink them under the keel band and re-fasten into the centre line timber with what effectively would be very large coach bolts. You would however have to cope with the fact the old bolt shanks remained embedded in the centre line structure until the end of time!

Finally Custom Yachts proposed to cut the bolt heads off so that they are below the external keel line and fill them in. Then drill new gallery pockets and bolt holes and refasten in between the old keel bolts with new ones-drama over.

Image

Image

Image

Image

User avatar
Scott Pett
Rear Admiral
Posts: 796
Joined: Mon Mar 29, 2004 9:49 am
Location: UK South Coast
Contact:

Post by Scott Pett »

I managed to remove a few of mine so far. Judicious application of a 7lb lump hammer and a length of 3/8 steel rod. Until I got to number 5 and it wouldn't move at all. I eventually found out that that particular bolt was sitting on a keel support block!

I still haven't worked out how to shift the ones in the engine bay. Perhaps an 11mm hole straight down the centre engine bearer and a longer piece of steel? Or perhaps, as you say, drive them up from the bottom and keep cutting them off. I'm sure the air chisel with an appropriate bit will save having to swing the hammer upwards

A great source of leaks, wasted keel bolts.

Frustratingly yours,
S

briangell
Carpenter
Posts: 47
Joined: Sun Jan 16, 2011 12:36 pm
Location: United Kingdom

Post by briangell »

Please could you tell me what kind of top coat you intend to use,also the method of application.
Thanks Brian Gell.

Midnight Blue
Commodore
Posts: 259
Joined: Wed Jan 28, 2009 8:13 pm
Location: United Kingdom

Post by Midnight Blue »


Brian
For the hull paint I used Awlgrip, Polyester Urethane Topcoat, but I have been told that if it's not 'Awlcraft 2000' then it's not easy to patch repair and achieve a good finish. But Im very happy with the Awlgrip. I had the hull sparayed this year, but in previous years it was hand painted and it looked good.

I used gold leaf on the cavita line. It was not put on very well in 2009 and that may be the reason why it had a very short shelf life! It looked amazing when it was new but this year I used Awlgrip 'Cordovan Gold'.

International make a great deck paint, I forget the name, but I used that for the coachroof and it is like paint with sand in it! looks very good.

I had the undersides stripped this year back to bear wood. I then gave the wood 3 coats of epoxy, an interesting job as there is a chemical window within which the next coat has to be applied. But you have to let the timber dry right out-that took 5-6 months in a shed with gentle heat...

I swear by International Interspeed Ultra which I have used for antifoul and Trilux for the boot line. This year I applied 3 coats but in future years I hope only two are neccessary.

I am trying out Trilux Dev O Prop which is a spray on material, for the props and shafts etc. The Hamble gets pretty weedy when the temperature gets up in the summer.

briangell
Carpenter
Posts: 47
Joined: Sun Jan 16, 2011 12:36 pm
Location: United Kingdom

Post by briangell »

Thanks for that information,I should strip my antifoul but it seems a long difficult job,probably next winter!I have had other reports on Awlgrip,good.

Thanks once again,Brian.

Post Reply